
Background
Birka was a major Viking Age trading settlement located on Björkö Island in Sweden’s Lake Mälaren. The settlement was founded around 750 CE and abandoned around 975 CE. Of the approximately 3,000 burials associated with the Birka settlement, approximately one third have been investigated and provided significant information on the Viking Age in Sweden and surrounding areas.
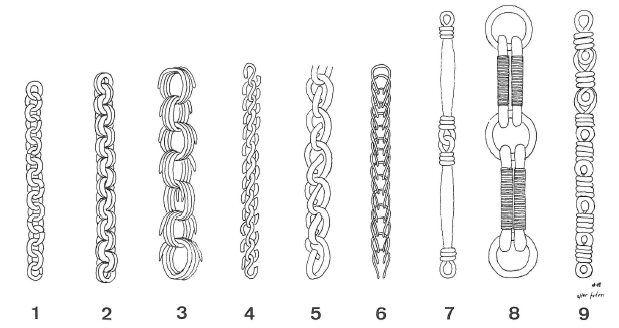
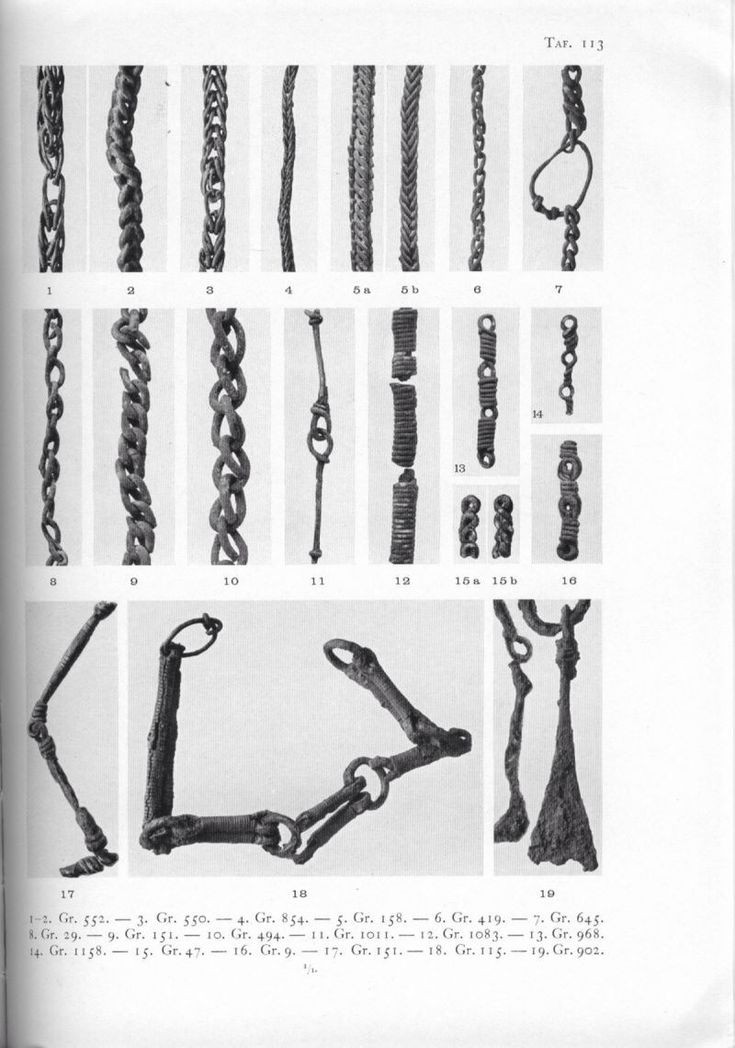
The major publications on Birka are the three volumes written by Holman Arbman (Birka I: Die Gräber), Greta Arwidsson (editor) (Birka II: Systematische Analysen der Gräberfunde, split into 3 subvolumes), and Agnes Geijer (Birka III: Die Textilfunde aus den Gräbern). In Birka II:3, Arwidsson describes nine types of chain found in the investigated Birka graves. She describes Type 8 as “Ketten aus langen Eisengliedern die dicht mit rundem Bronzedraht umwunden sind und an den Enden mitje einer zusammengebogenen Öse abschliessen.” (Arwidsson, Greta. Birka II: Systematische Analysen Der Gräberfunde. Stockholm: Royal Swedish Academy of Letters, History and Antiquities, 1989, page 74. Translation: Chains of long iron links that are tightly wound with round bronze wire and close at the ends with a bent eyelet.)
Type 8 chain is uncommon in the Birka finds, the best example comes from Bj 115. (Birka graves are identified by the prefix Bj and a sequential number.) Bj 115 was a cremation burial on the northern end of the island in Cemetary 1E. The cremated remains and surviving grave goods were found in a ceramic vessel. In addition to the piece of chain, surviving grave goods include unidentified bronze and iron fittings, a rivet, a comb, and a piece of flint. (Bj 115 inventory) There was no indication of the gender of the burial, or if the burial contained more than one person.
Given the nature of the burial (cremation versus inhumation), I am assuming that the chain was used as a dress-accessory rather than a functional piece of hardware (I would not expect to find a piece of hardware, such as chain used to suspend a cooking platform or lamp to be cremated with a body, whereas I would expect that body to be dressed in its firey with jewelry and such).
Edited to add: I talked to a friend who has seen the piece in person and she reports that the links were smaller than what I made. She guestimated that the rings between the links were approximately 6mm. I’ve sent an email to the Swedish Historical Museum to see if I can get confirmation.
Descriptions from Birka II:3
From Birka II:3 pp 74 – 75
Typ 8
Ketten aus langen Eisengliedern die dicht mit rundem Bronzedraht umwunden sind und an den Enden mitje einer zusammengebogenen Öse abschliessen.
Die Ösen der glieder greifen ineinander (Bj 104) oder sie sind paarweise an ringförmige zwischenglieder angeschlossen, die aus rundem Eisendraht zusammengebogen sind (Bj 115).
Type 8
Chains of long iron links that are tightly wound with round bronze wire and close at the ends with a bent eyelet.
The eyelets of the limbs engage with each other (Birka Grave 104) or they are connected in pairs to ring-shaped intermediate links, which are bent together from round iron wire (Birka Grave 115).
Birka II:3, pg 77
Ketten aus langen Eisengliedern, die dicht mit rundem Bronzedraht umwunden sind und deren beide Enden zu Ösen der Glieder greifen entweder einzeln in die Öse des anschliessendenGliedes (Bj 104), oder sie werden paarweise durch ringförmige Zwischenglieder verbunden, die aus runden Eisendrähten zusammengebogen sind (Bj 115).
In dem Grab Bj 1083 gibt es eine Variante von Typ 8 in fragmentarischem Zustand. Bei den vier Framenten ist der Bronzedraht um Lederstreifen statt um Eisenstäbchen gewickelt. Zu der Technik dieser Variante von Typ 8 gibt es in den baltischen Funden viele Entsprechungen. Spiralen aus Bronzedraht können in Gebebe einegefügt sein oder un Fäden oder Streifen aus organischem Material gewunden sein. (Vgl. U.a. Ginters 1981, Abb. 38). Ledergürtel mit Quasten aus schmalen Lederstreifen, die mit Bronzespiralen umwickelt waren, sind übrigens ein charakteristisches Zubehör der Männertracht der Wikingerzeit auf Gotland (Stenberger 1962, 49, Abb. 38, 40, 41, 44, von dem Gräberfeldern Ihre/Hellvi und Sandegarda/Sanda). Sternberger meint, dass Quasten dieser Art wahrscheinlich ostbaltischen Ursprungs sind (Sternberger 1962, Abb. 38, 44).
Chains of long iron links tightly wound with round bronze wire and both ends of which loop into loops of the links either individually engage the loop of the adjoining link (Bj 104), or are connected in pairs by annular links bent together from round iron wires (Bj 115).
In the grave Bj 1083 there is a variant of type 8 in fragmentary condition. In the four links, the bronze wire is wound around strips of leather instead of iron rods. There are many similarities to the technique of this type 8 variant in the Baltic finds. Bronze wire spirals may be incorporated into frames or wound in filaments or strips of organic material. (See U.a Ginters 1981, Fig. 38). By the way, leather belts with tassels made of narrow strips of leather wrapped in bronze spirals are a characteristic accessory of the Viking man’s costume on Gotland (Stenberger 1962, 49, figs. 38, 40, 41, 44, of the cemeteries of her / Hellvi and Sandegarda /Sanda). Sternberger thinks that tassels of this kind are probably of Eastern Baltic origin (Sternberger 1962, fig. 38, 44).
Materials
The original materials used were iron and round bronze wire. (Birka II, pg 74.)
Iron
Arwidsson does not provide any information on the iron used in the links, other than that the rings connecting links in Bj 115 were made out of “runden Eisendrähten” (round iron wire).
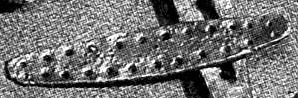
The majority of iron used in Viking Age Scandinavia was smelted from bog iron. (Hurstwic) I smelted my iron by purchasing it from a reputable trader (Etsy). I chose to use wire, rather than billets because the one photo I could find of a Type 8 chain (shown above) seems to indicate that the iron links were round. The iron I ordered was 12 gauge black annealed wire. The black color was particularly striking against the bronze wire.
Round Bronze Wire
Arwidsson describes the bronze wire as “rundem Bronzedraht” (round bronze wire). She provided no other information on the size of the wire.
In my reconstruction, I used pre-made 20 gauge bronze wire purchased from the internet. The wire is manufactured commercially and therefore, is of a more consistent quality than the bronze wire used in the original. I elected to purchase the wire rather than make my own because I’m not equipped to make bronze or wire. After looking again at the photos of the extent chain, I think I should have ordered 28 or 30 gauge wire.
Niklas Stjerna wrote an interesting article on the production of copper wire for B-type case-combs. The methods of wire construction discussed by Stjerna may have been the same as the methods used to create bronze wire. (Stjerna, Niklas. A short notice on the manufacture of copper-wire in Birka. Laborativ Arkeologi 10-11 (1998), pages 85-88.)
Historical Construction
We have no written documentation for how a chain of this type was produced in the Viking Age. However, there are some archaeological finds that might provide additional information.
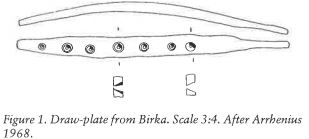
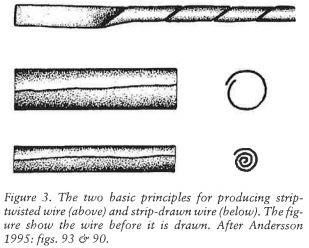
Wire was produced in a couple of different ways. Heavy wire, like iron wire, was likely produced by drawing an iron bar through progressively smaller holes of a draw plate.
Finer wire could be produced using the same method or by “strip twisting” or “strip drawing” pieces of fine metal to produce the narrow gauge decorative wire.
There was a bit of debate among the folks I talked to about this project about what the next step should be. I believe iron links would have been made out of segments of iron wire, formed into shape by hammering and twisting with pliers. The other argument is that the holes in the wire were punched through rather than constructed by curling the ends over. I agree that this is possible, but based on the description and photo above I think curling the ends over is possible. However, without better photos or more information about the direction of the slag intrusions in the ends, I cannot conclusively say which way is more correct.
If the ends were turned over, I think they must have been hammered either before or as they were turned over.

From experimentation, I can say it’s fairly easy to wrap the bronze around the iron by twisting the iron by holding a coil of bronze in the palm of the hand and twisting the iron link to pull the bronze around it. I believe that it’s reasonable to assume that this is how the bronze was wound in period.
I did some digging on the manufacture of links for chainmail in the Viking Age and found that two methods were used. One method involved drawing an iron wire around a wooden dowel to create a coil. Given the description in Birka II, “annular links bent together from round iron wires”, I believe this is the method used to create the rings connecting the links in the chain in Bj 115. I believe the coil must have been cut with a saw, given the lack of pinched ends expected with a chisel cut. However, I must note that such marks could be there and just not visible in the ONE SINGLE PHOTO OF THE CHAIN THAT HAS EVER BEEN TAKEN.
I believe the final construction of the chain would have been accomplished by twisting the rings apart using pliers, such as those from the Mästermyr Chest, or very strong fingers, slipping the links through the ring, and the twisting it closed.
Cleaning up and finishing the chain could have been accomplished with small files, similar to the files in the Mästermyr Chest.
My Construction
- Making the iron links.
- My first step was to cut 28 segments of iron wire, each approximately 2.5 inches long. Because the only photo I could find of a Type 8 wire did not include anything like a scale, I pulled 2.5 inches from the clear blue sky. In retrospect, the segments should probably have been closer to 1.5 inches based on relative size of things in the photo, but that’s what you get for not looking at your reference image more often. I cut the wire with wire snips instead of a saw because I know how to use the snips.

- Step two was to straighten the segments. This was the part of the process that I was probably the most historically correct in my construction techniques. I put the wire on a steel block and hit it with a hammer until it was straightened out. Whap, whap, whap!

- Step three was to curl the ends over. To do this, I used round-nosed pliers and my Hulk-like strength. If I try this again, I’m going to try hammering the ends out before I curl them over. I think that will help the ends look more finished.
- My first step was to cut 28 segments of iron wire, each approximately 2.5 inches long. Because the only photo I could find of a Type 8 wire did not include anything like a scale, I pulled 2.5 inches from the clear blue sky. In retrospect, the segments should probably have been closer to 1.5 inches based on relative size of things in the photo, but that’s what you get for not looking at your reference image more often. I cut the wire with wire snips instead of a saw because I know how to use the snips.
- Doing the bronze wrap.
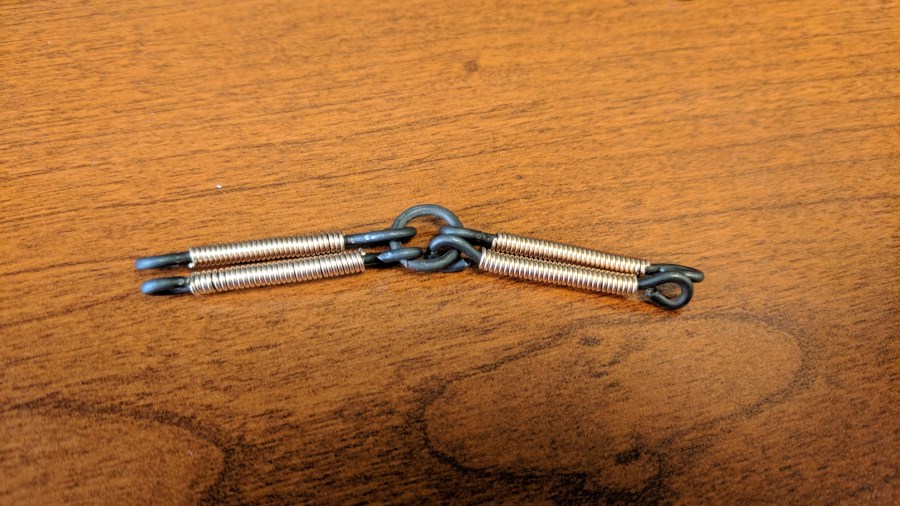
- The bronze wrap was done two different ways. In the picture below, the upper link was wrapped by turning the link in a clamp with a hand-operated crank. The lower link was wrapped by turning the link in my hand. In my opinion, the differences are de minimis. I believe that the hand twisted method is probably the more historical method, but I have no evidence to back this up.
 Comparing the results of the two methods
 Wrapping by hand
 Wrapping by crank
- The bronze wrap was done two different ways. In the picture below, the upper link was wrapped by turning the link in a clamp with a hand-operated crank. The lower link was wrapped by turning the link in my hand. In my opinion, the differences are de minimis. I believe that the hand twisted method is probably the more historical method, but I have no evidence to back this up.
- Making the round links.
- Making the round links was a lot like making rings for chainmail. I wound the iron wire around a mandrel and then slid the coil off.

The prettiest coil - I cut links from the coil using a jeweler’s saw to ensure that the ends would meet cleanly. I cut away from my body to avoid cutting my body. This was about as boring as things could get.
- Making the round links was a lot like making rings for chainmail. I wound the iron wire around a mandrel and then slid the coil off.
- Putting it all together!
- I twisted the rings apart using two pliers, slipped the links in, and twisted the rings closed. Easy peasy.

- I twisted the rings apart using two pliers, slipped the links in, and twisted the rings closed. Easy peasy.
- As a final step, I used a narrow file to clean up spurs and other imperfections. In retrospect, I should have done this in between each stage in the manufacture of the chain, to avoid marking things up. As it stands, there are definitely some unsightly tool marks and scratches, especially on the iron.
Conclusion
The final necklace is about 27 inches long and contains 28 links and 14 rings.
I would give my final project a rating of 5/10 on authenticity. The materials are largely authentic (except that I bought commercial wire rather than draw my own) and the techniques I used are reasonably plausible. I think I lost points by using definitely modern tools. Also, while I think the bright bronze is very striking against the dark iron, I don’t know if this is how it would have appeared in period. Finally, now that I’m all done, it’s worth noting that there’s no evidence that the Type 8 chain was used as a necklace. Indeed there’s very little if any evidence of chain necklaces in the Viking Age. So that’s where all my other authenticity points have gone.
But still, it is awfully shiny to look at.
